Sci-Pype - Jupyter + Redis + Docker
Date: 2016-08-01
Building Scientific Data Pipelines for Jupyter in Docker
Sci-Pype is a framework for building data science pipelines. It uses a specialized Jupyter docker container extended from the original https://github.com/jupyter/docker-stacks that already support Python 2, Python 3, R, and Julia notebooks. I use sci-pype for machine learning, data analysis, data-sharing, model refinement, and stock analysis projects. It contains a python 2 core for making it easier to integrate with external databases and redis servers, debugging with slack, and colorized notebook logging.
This core was originally built to datamine news releases in near-real time. Now I use it for analyzing, exchanging and sharing data with Jupyter. With this core, I build machine learning models that are published and persisted as JSON or serialized objects using pickle. These models are deployed and tested with a load-balanced redis cluster.
Please note this is a large docker container so it may take some time to download and it extracts to ~6.8 GB on disk.
GitHub Repository: https://github.com/jay-johnson/sci-pype
Overview
The docker container runs a Jupyter web application. The web application runs Jupyter Notebooks as kernels that can be implemented in Python 2, 3, R, or Julia. For now the examples and core included in this repository will only work with Python 2.
This container can run in three modes:
Local development
To start the local development version run: start.sh
./start.sh
You can login to the container with:
./ssh.shFull Stack
To start the full stack mode run: compose-start-full.sh
./compose-start-full.sh
The full-stack-compose.yml will deploy three docker containers using docker compose:
MySQL Database container with phpMyAdmin for Stock Data (from the schemaprototyping repo)
Jupyter
Redis server (jayjohnson/redis-single-node) on port 6000
Standalone Testing
To start the full stack mode run: compose-start-jupyter.sh
./compose-start-jupyter.sh
The jupyter-docker-compose.yml is used to deploy a single Jupyter container.
Working Examples
This document details the following examples. Please refer to the examples directory for the latest.
-
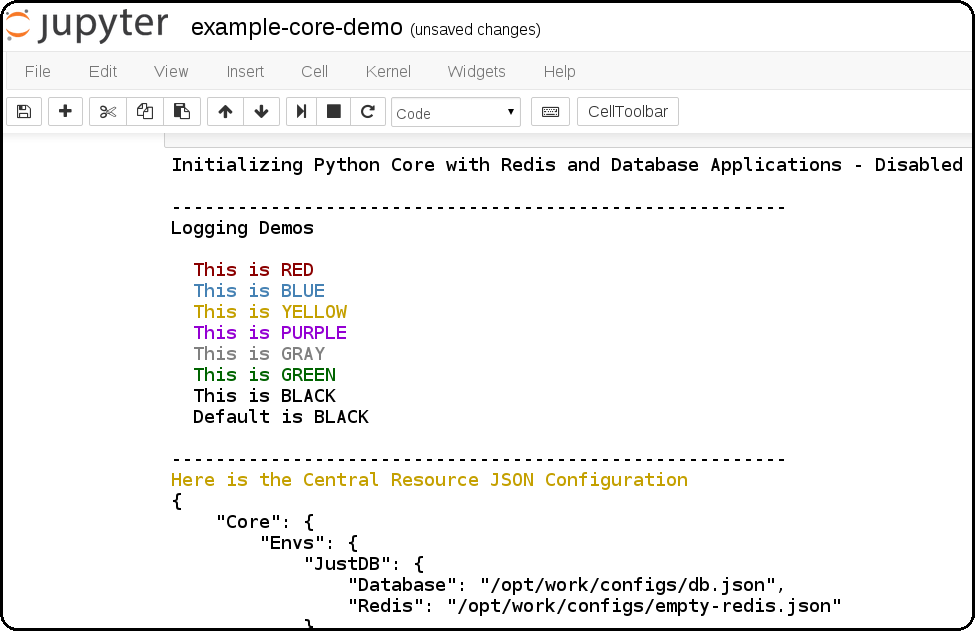
How to use the python core from a Jupyter notebook. It also shows how to debug the JSON application configs which are used to connect to external database(s) and redis server(s).
-
Jupyter + Downloading the SPY Pricing Data
Download the SPY ETF Pricing Data from Google Finance and store it in the shared
ENV_PYTHON_SRC_DIRdirectory that is mounted from the host and into the Jupyter container. It uses a script that downloads the SPY daily pricing data as a csv file.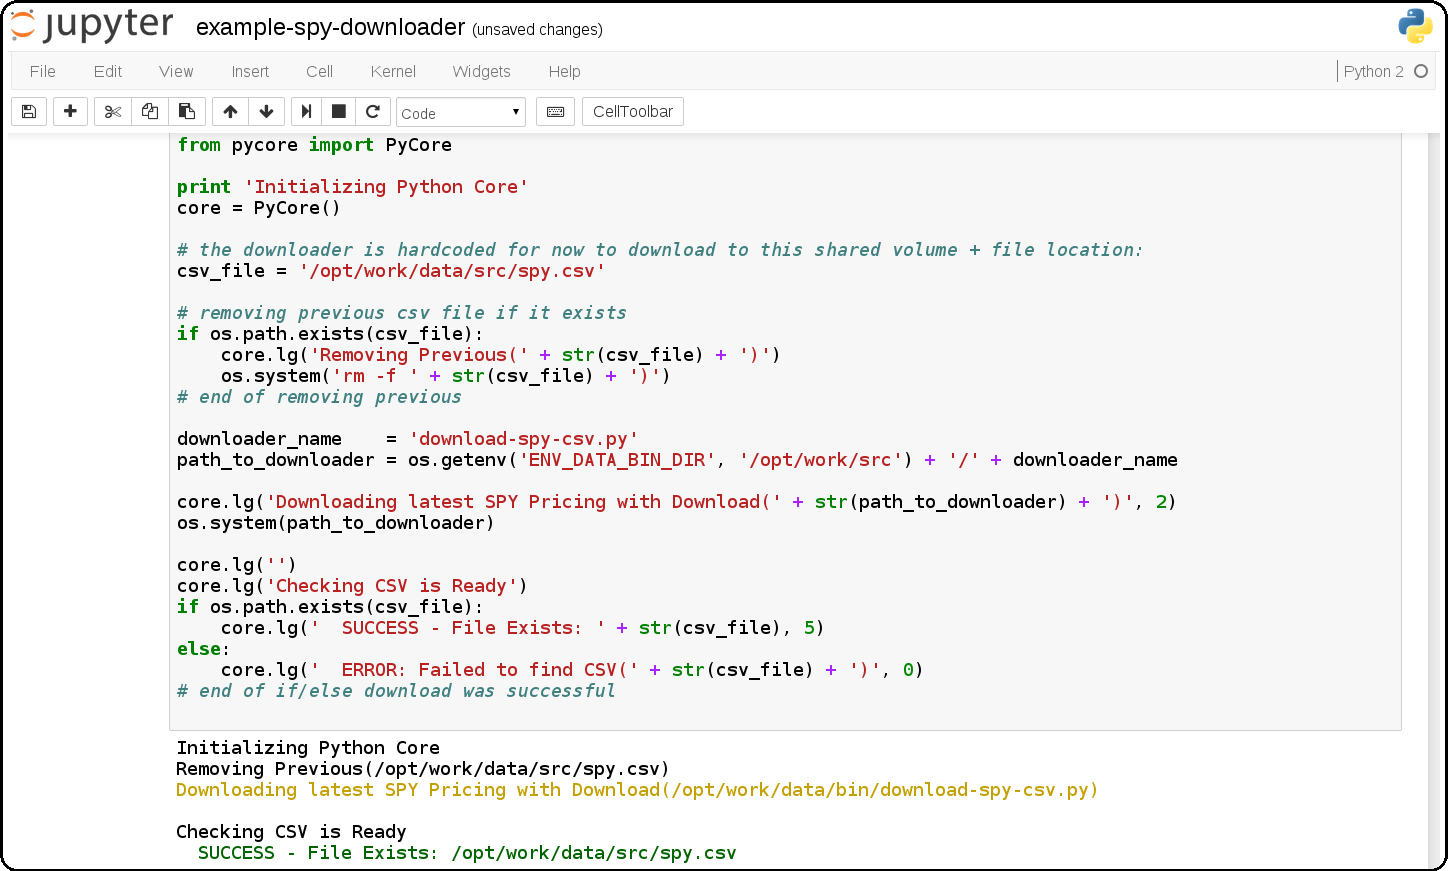
-
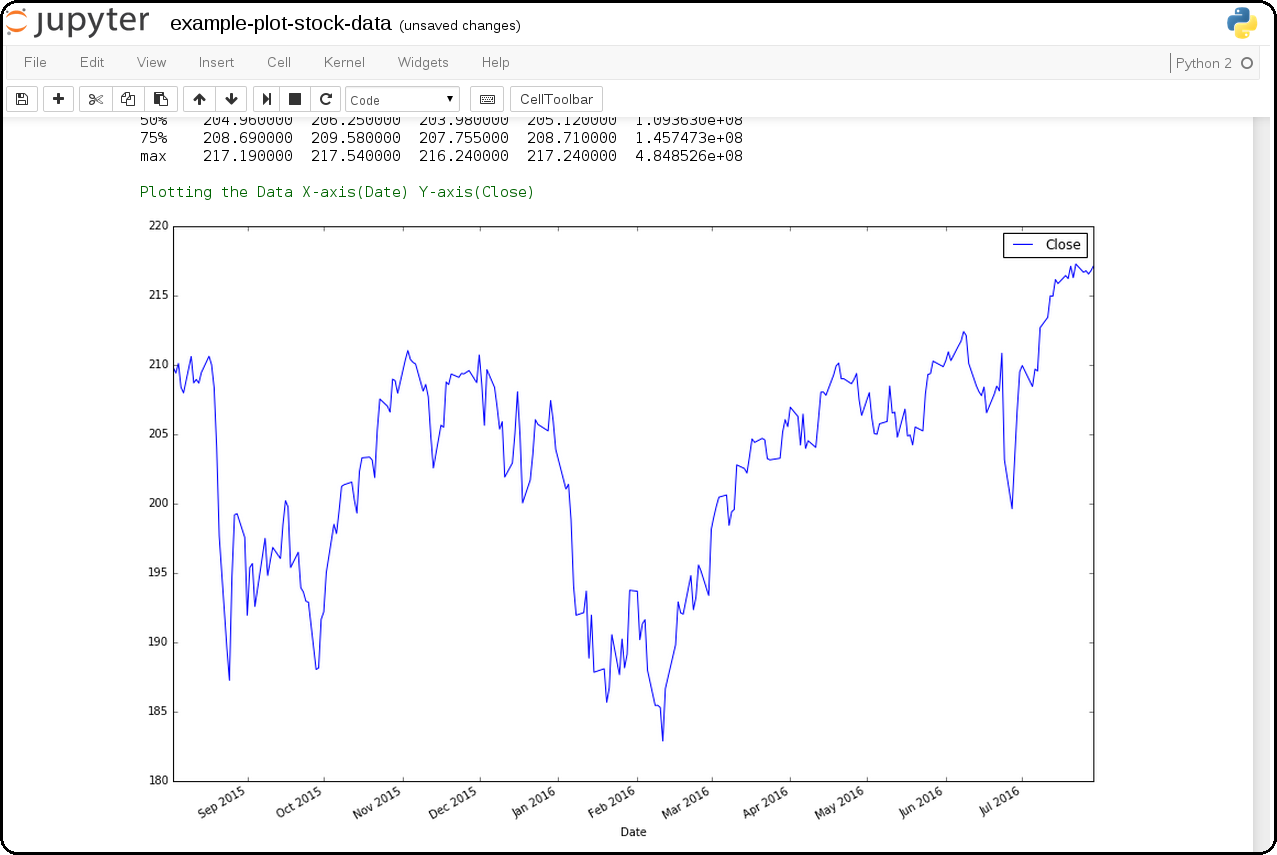
Download SPY and use Pandas + Matlab to Plot Pricing by the Close
This shows how to download the SPY daily prices from Google Finance as a csv then load it using Pandas for plotting on the Close prices with Matlab.
example-redis-cache-demo.ipynb
Building a Jupyter + Redis Data Pipeline
This extends the previous SPY pricing demo and publishes + retreives the pricing data by using a targeted
CACHEredis server (that runs inside the Jupyter container). It stores the Pandas dataframe as JSON in theLATEST_SPY_DAILY_STICKSredis key.
example-db-extract-and-cache.ipynb
Building a Jupyter + MySQL + Redis Data Pipeline
This requires running the Full Stack which uses the https://github.com/jay-johnson/sci-pype/blob/master/full-stack-compose.yml to deploy three docker containers on the same host:
MySQL (https://hub.docker.com/r/jayjohnson/schemaprototyping/)
Redis (https://hub.docker.com/r/jayjohnson/redis-single-node/)
How it works

Extract the IBM stock data from the MySQL dataset and store it as a csv inside the /opt/work/data/src/ibm.csv file
Load the IBM pricing data with Pandas
Plot the pricing data with Matlab
Publish the Pandas Dataframe as JSON to Redis
Retrieve the Pandas Dataframe from Redis
Test the cached pricing data exists outside the Jupyter container with:
$ ./redis.sh
SSH-ing into Docker image(redis-server)
[root@redis-server container]# redis-cli -h localhost -p 6000
localhost:6000> LRANGE LATEST_IBM_DAILY_STICKS 0 0
1) "(dp0\nS'Data'\np1\nS'{\"Date\":{\"49\":971136000000,\"48\":971049600000,\"47\":970790400000,\"46\":970704000000,\"45\":970617600000,\"44\":970531200000,\"43\":970444800000,\"42\":970185600000,\"41\":970099200000,\"40\":970012800000,\"39\":969926400000,\"38\":969

 ... removed for docs ...

localhost:6000> exit
[root@redis-server container]# exit
exit
$
-
Jupyter + Slack Driven Development
This example shows how environment variables allow the python core to publish a message into Slack to notify the associated user with a message containing the line number and source code that threw the exception.

Components
Python 2 Core
The PyCore uses a JSON config file for connecting to redis servers and configurable databases (MySQL and Postgres) using SQLAlchemy. It has only been tested with the Python 2.7 kernel.
Local Redis Server
When starting the container with
ENV_DEPLOYMENT_TYPEset to anything notJustDB, the container will start a local redis server inside the container on port6000for iterating on your pipeline analysis, model deployment and caching strategies.Loading Database and Redis Applications
By default the jupyter.json config supports multiple environments for integrating notebooks with external resources. Here is table on what they define:
Name
Purpose
Redis Applications
Database Applications
Local
Use the internal redis server with the stock db
NoApps
Run the core without redis servers or databases
JustRedis
Run with just the redis servers and no databases
JustDB
Run without redis servers and load the databases
Test
Connect to external redis servers and databases
Live
Connect to external redis servers and databases
Inside a notebook you can target a different environment before loading the core with:
Changing to the JustRedis Environment:
import os
os.environ["ENV_DEPLOYMENT_TYPE"] = "JustRedis"
core = PyCore()
Changing to the NoApps Environment:
import os
os.environ["ENV_DEPLOYMENT_TYPE"] = "NoApps"
core = PyCore()
Customize the Jupyter Container Lifecycle
The following environment variables can be used for defining pre-start, start, and post-start Jupyter actions as needed.
Environment Variable
Default Value
Purpose
ENV_PRESTART_SCRIPT
Run custom actions before starting Jupyter
ENV_START_SCRIPT
Start Jupyter
ENV_POSTSTART_SCRIPT
Run custom actions after starting Jupyter
Slack Debugging
The core supports publishing exceptions into Slack based off the environment variables passed in using docker or docker compose.
Tracking Installed Dependencies for Notebook Sharing
This docker container uses these files for tracking Python 2 and Python 3 pips:
/opt/work/pips/python2-requirements.txt
/opt/work/pips/python3-requirements.txt
Shared Volumes
These are the mounted volumes and directories that can be changed as needed. Also the core uses them as environment variables.
Host Mount
Container Mount
Purpose
/opt/project
/opt/project
Sharing a project from the host machine
/opt/work/data
/opt/work/data
Sharing a common data dir between host and containers
/opt/work/data/src
/opt/work/data/src
Passing data source files into the container
/opt/work/data/dst
/opt/work/data/dst
Passing processed data files outside the container
/opt/work/data/bin
/opt/work/data/bin
Exchanging data binaries from the host into the container
/opt/work/data/synthesize
/opt/work/data/synthesize
Sharing files used for synthesizing data
/opt/work/data/tidy
/opt/work/data/tidy
Sharing files used to tidy and marshall data
/opt/work/data/analyze
/opt/work/data/analyze
Sharing files used for data analysis and processing
/opt/work/data/output
/opt/work/data/output
Sharing processed files and analyzed output
Getting Started
Local Jupyter
Start the Container in Local development mode
$ ./start.sh
Starting new Docker image(docker.io/jayjohnson/jupyter)
4275447ef6a3aa06fb06097837deeb202bd80b15969a9c1269a5ee042d8df13d
$
Browse to the local Jupyter website
Full Stack
The full-stack-compose.yml patches the Jupyter and redis containers to ensure the MySQL database is listening on port 3306 before starting. It does this by defining a custom entrypoint wrapper for each in the wait-for-its tools directory.
Start the Composition
This can take around 20 seconds for MySQL to set up the seed pricing records, and it requires assigning the shared data directory permissions for read/write access from inside the Jupyter container.
$ ./compose-start-full.sh
Before starting changing permissions with:
   chown -R driver:users /opt/work/data/*
[sudo] password for driver:
Starting Composition: full-stack-compose.yml
Starting stocksdb
Starting jupyter
Starting redis-server
Done
$
Check the Composition
$ docker ps
CONTAINER ID        IMAGE                                COMMAND                  CREATED             STATUS              PORTS                                        NAMES
1fd9bd22987f        jayjohnson/redis-single-node:1.0.0   "/wait-for-its/redis-"   12 minutes ago      Up 25 seconds       0.0.0.0:6000->6000/tcp                       redis-server
2bcb6b8d2994        jayjohnson/jupyter:1.0.0             "/wait-for-its/jupyte"   12 minutes ago      Up 25 seconds       0.0.0.0:8888->8888/tcp                       jupyter
b7bce846b9af        jayjohnson/schemaprototyping:1.0.0   "/root/start_containe"   25 minutes ago      Up 25 seconds       0.0.0.0:81->80/tcp, 0.0.0.0:3307->3306/tcp   stocksdb
$
Optional - Login to the database container
$ ./db.ssh
SSH-ing into Docker image(stocksdb)
[root@stocksdb db-loaders]# ps auwwx | grep mysql | grep -v grep
root        28  0.0  0.0  11648  2752 ?        S    17:00   0:00 /bin/sh /usr/bin/mysqld_safe
mysql      656  1.3 12.0 1279736 474276 ?      Sl   17:00   0:01 /usr/sbin/mysqld --basedir=/usr --datadir=/var/lib/mysql --plugin-dir=/usr/lib64/mysql/plugin --user=mysql --log-error=/var/log/mysql/error.log --pid-file=/var/lib/mysql/mysqld.pid --socket=/var/lib/mysql/mysqld.sock --port=3306
[root@stocksdb db-loaders]# exit
View the Stocks Database with phpMyAdmin: http://localhost:81/phpmyadmin/sql.php?db=stocks&table=stocks
Note
By default the login to this sample db is:
dbadmin/dbadmin123which can be configured in the db.envOptional - Login to the Redis container
$ ./redis.sh
SSH-ing into Docker image(redis-server)
[root@redis-server container]# ps auwwx | grep redis
root         1  0.0  0.0  11644  2616 ?        Ss   17:00   0:00 bash /wait-for-its/redis-wait-for-it.sh
root        28  0.0  0.2 114800 11208 ?        Ss   17:00   0:00 /usr/bin/python /usr/bin/supervisord -c /etc/supervisor.d/rediscluster.ini
root        30  0.3  0.0  37268  3720 ?        Sl   17:00   0:00 redis-server *:6000
root        47  0.0  0.0   9044   892 ?        S+   17:02   0:00 grep --color=auto redis
[root@redis-server container]# exit
Optional - Login to the Jupyter container
$ ./ssh.sh
SSH-ing into Docker image(jupyter)
driver:/opt/work$ ps auwwx | grep jupyter
driver       1  0.0  0.0  13244  2908 ?        Ss   17:00   0:00 bash /wait-for-its/jupyter-wait-for-it.sh
driver      38  0.3  1.2 180564 48068 ?        S    17:00   0:00 /opt/conda/bin/python /opt/conda/bin/jupyter-notebook
driver:/opt/work$ exit
Run the Database Extraction Jupyter Demo
Open the notebook with this url: http://localhost:82/notebooks/examples/example-db-extract-and-cache.ipynb
Click the Run Button
This example will connect to the
stocksdbMySQL container and pull 50 records from IBM’s pricing data. It will then render plot lines for Open, Close, High, and Low using Pandas and Matlab. Next it will cache the IBM records in theredis-servercontainer and then verify those records were cached correctly by retrieving it again.From outside the Jupyter container confirm the redis key holds the processed IBM data
$ ./redis.sh
SSH-ing into Docker image(redis-server)
[root@redis-server container]# redis-cli -h localhost -p 6000
localhost:6000> LRANGE LATEST_IBM_DAILY_STICKS 0 0
1) "(dp0\nS'Data'\np1\nS'{\"Date\":{\"49\":971136000000,\"48\":971049600000,\"47\":970790400000,\"46\":970704000000,\"45\":970617600000,\"44\":970531200000,\"43\":970444800000,\"42\":970185600000,\"41\":970099200000,\"40\":970012800000,\"39\":969926400000,\"38\":969

 ... removed for docs ...

localhost:6000> exit
[root@redis-server container]# exit
exit
$
Stop the Composition
$ ./compose-stop-full.sh
Stopping Composition: full-stack-compose.yml
Stopping redis-server ... done
Stopping jupyter ... done
Stopping stocksdb ... done
Done
$
Standalone
Start Standalone
Start the standalone Jupyter container using the jupyter-docker-compose.yml file. This compose file requires access to
/opt/work/datahost directory like the Full Stack version for sharing files between the container and the host.$ ./compose-start-jupyter.sh Before starting changing permissions with: chown -R driver:users /opt/work/data/* [sudo] password for driver: Starting Composition: jupyter-docker-compose.yml Starting jupyter Done $
Stop Standalone
Stop the standalone Jupyter composition with:
$ ./compose-stop-jupyter.sh
Stopping Composition: jupyter-docker-compose.yml
Stopping jupyter ... done
Done
$
Deleting the Containers
Remove the containers with the command:
$ docker rm jupyter redis-server stocksdb
jupyter
redis-server
stocksdb
$
Delete them from the host with:
$ docker rmi jayjohnson/schemaprototyping
$ docker rmi jayjohnson/jupyter
$ docker rmi jayjohnson/redis-single-node